Hey! Do you want to know How To set Custom Paper size in Epson LX-310?

Epson LX-310 is one of the best dot matrix printer. This printer is known for its reliability, speed, and quality. You can see this printer in a maximum of government organizations and retail stores where maximum works from only billing print. Here are some key features:
| Technology | DOT-MATRIX |
| SPEED | 430 CPS |
| Quality | 240 x 144 DPI |
| Capacity | 4,000 LPH |
| Interface | USB, Parallel,Serial |
Epson LX-310 is used because it is suitable for business use, high-speed printing, long-lasting print head, printing on different types of papers and this printer requires low maintenance.
Every company customizes the invoice according to their needs and uses different sizes for this. In Epson LX 310 you can set the paper size as per your requirement. If you want to know – How To set Custom Paper size in Epson LX-310, then follow the below steps-
How to Set Custom Paper Size in Epson LX-310?
STEP#1. Open the Control Panel.
STEP#2. Navigate to Devices and Printers and double-click on It.
Note: First Create a Paper size that should need to print.

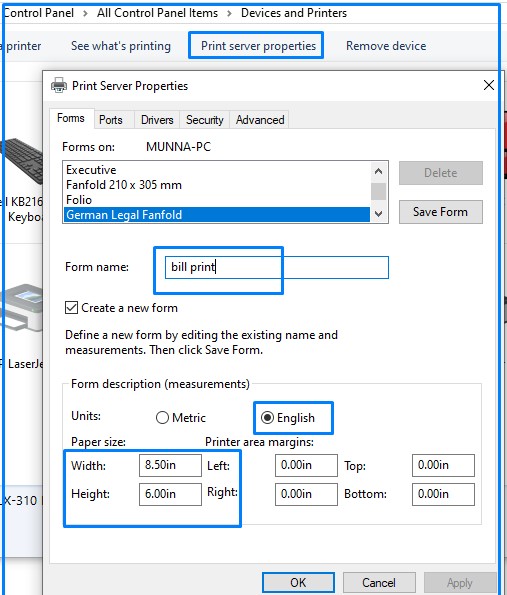
STEP#3. On the Right Size top, Click on Print Server properties.
STEP#4. Select Any Form. Now do the following as below-
- Select Create a new Form.
- In the Units Section select English.
- Now Set the Width and Height of the Paper, and Apply and OK.
STEP#4. Right-click on the EPSON LX-310 Printer and select Printer Properties.
STEP#5. Click on Device settings, Navigate to Manual Feed, and select Customize Size. Then Click on Apply and OK.

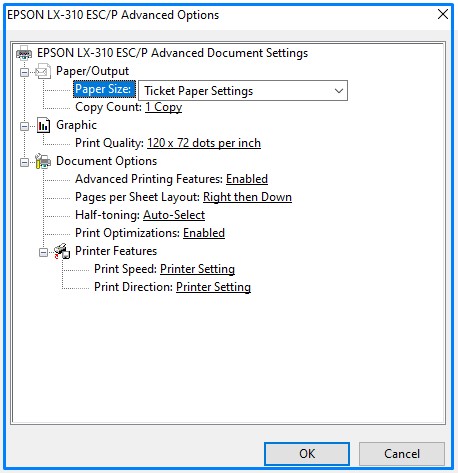
STEP#6. Now set the Paper Preferences. To set paper Preferences, Right-click on the Printer select Printing Preferences, and Click on Advanced Tab.
STEP#6. Navigate to Paper/Output select paper size and choose your Form. Click On OK.
Conclusion
We hope that through this post you have been able to set up the Epson paper easily. If you have any questions in your mind, please let us know through comments.

